| Updated Lead Section, Direct Video Upload To the Website, Quick Typography Settings, And More | |
|  | | Updated Lead Section | | The Leads table just got a refresh: It's now more compact and easier to navigate. The submissions view has also been upgraded—cards feature a more modern design, with all the information neatly organized in a two-column layout for better readability and structure.
| |
|  | | Customizable Fields | | You can now customize the table to fit your unique workflow: Resize columns, rearrange them, and choose which submission fields to show or hide. | | |
|  | | Mark With a Star | | You can highlight a lead with a star and choose from seven colors. It will be marked as read, and the entire row will be color-coded. | | |
|  | | Add Labels | | Organize leads by adding custom labels, such as "Processing" or "Shipped." You can define label names and colors, and filter leads by labels. | | |
|  | | Add Notes | | You can now leave internal comments in the lead card. For example, include a note about fragile goods for the fulfillment team.
| | |
| | In Lead actions, a new Print option is now available. You can also use a shortcut Cmd/Ctrl + P to quickly initiate printing. | |
|  | | Lead Status For Data Receivers | | |
| | You can now see the delivery status of each lead for connected third-party data collection services. If an error occurs during delivery, a warning sign will appear. | |
|  | | Upload Video Files To Your Website | | You can now upload video files up to 5MB directly to your website—no third-party services needed. This is useful for adding short decorative clips like video covers. Video uploads are available in pre-designed blocks from the Video, Cover, Form, and Gallery categories, as well as in Zero Block.
| |
|  | | Quick Access To Typography Settings | | You can now modify typography directly on the page, without opening the block's Settings tab. Simply Cmd/Ctrl + click on a text element, or right-click it and choose "Typography" from the context menu.
| |
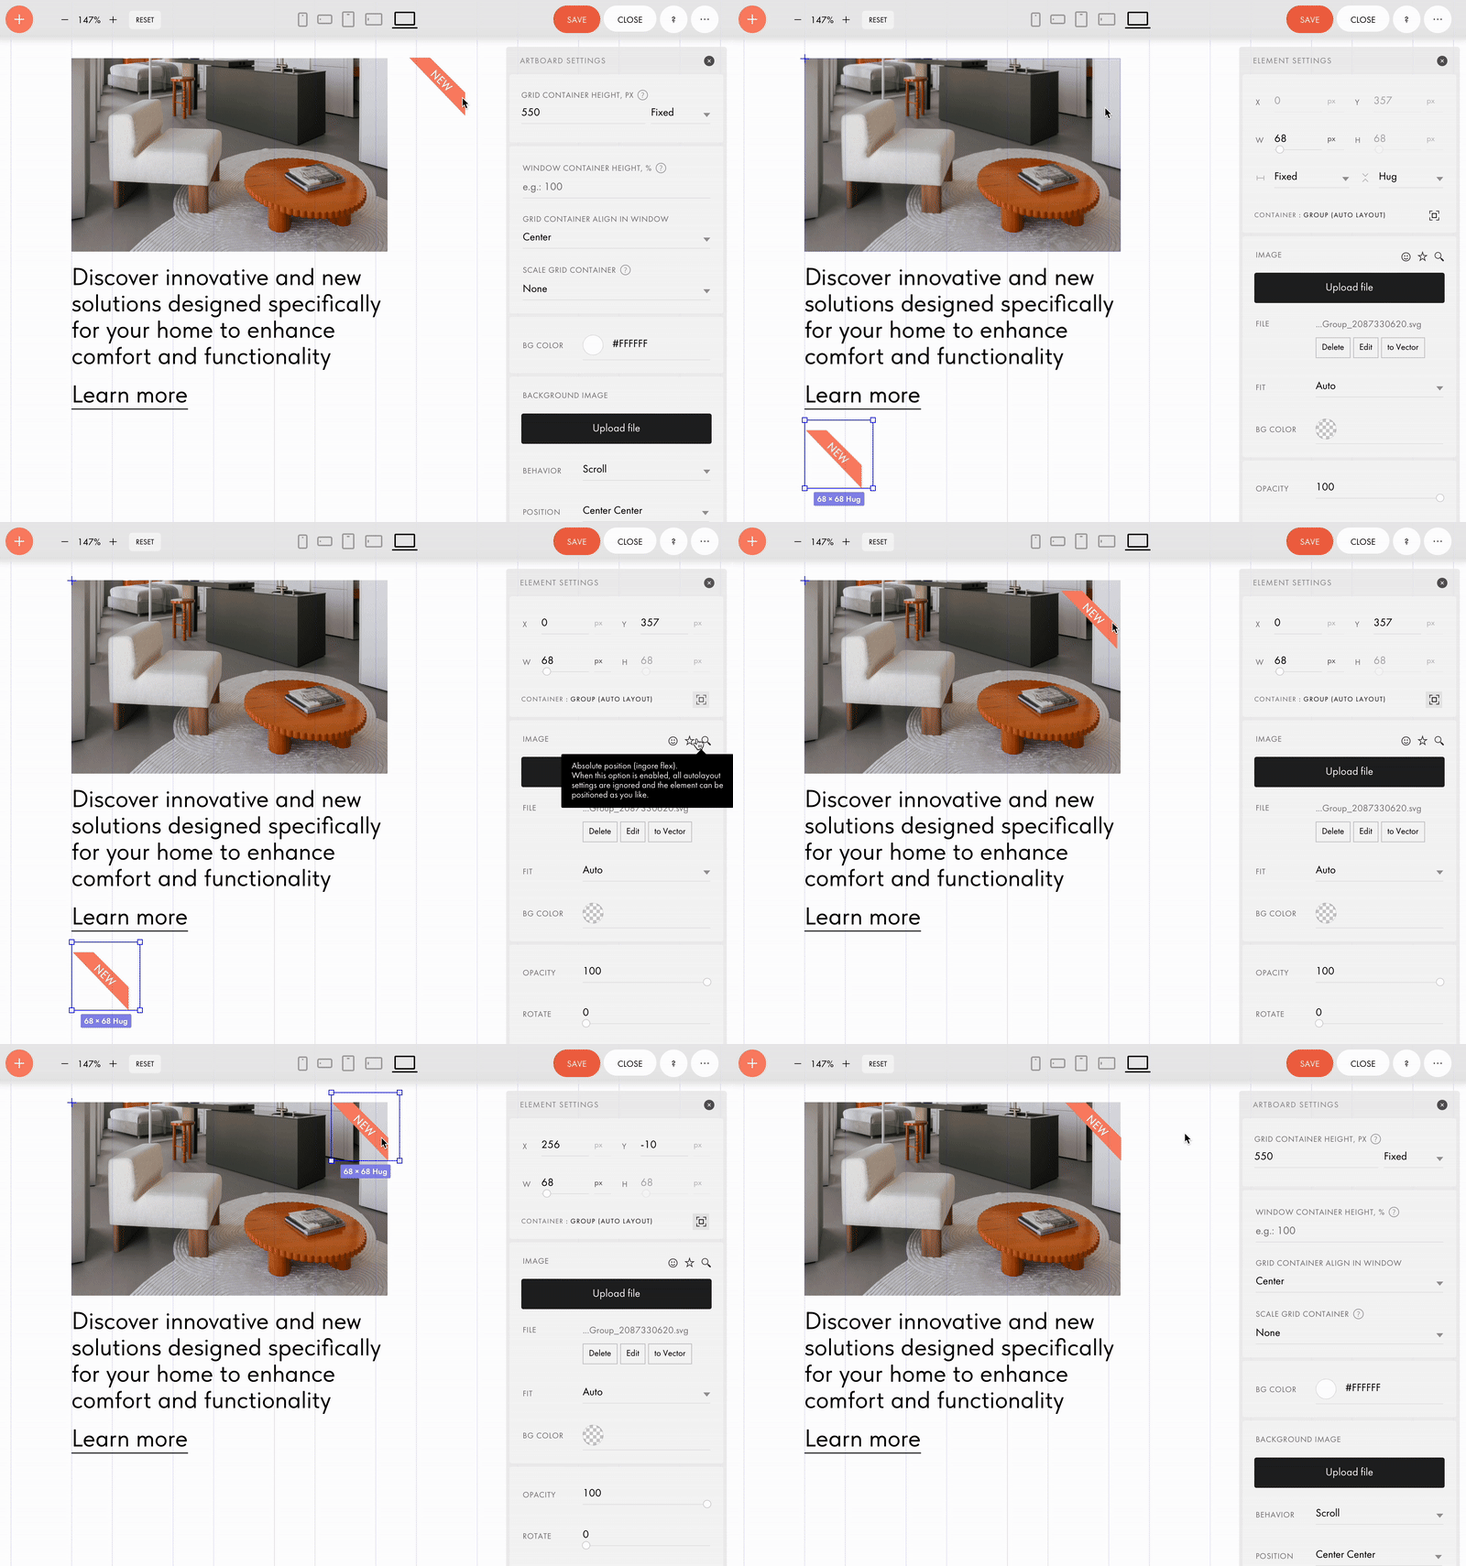
|  | | Absolute Positioning In Auto Layout | | You can now set an element within Auto Layout to Absolute Position, allowing it to ignore Flex settings. This is useful when you want to freely position an element that is a part of the Auto Layout, for instance, to place a "New" label in the corner of a product card.
| |
|  | | New Authorization Method In the Members Area | | Now members can log in using their phone number or email. You can set which option to show by default, and users can switch to the method they prefer.
Where to find: Members Area Settings → Advanced → Signup & Login Methods → Phone or email | | |
|  | | Free Workshops In August | | Learn to build beautiful, user-friendly websites with guidance from Tilda experts. Our practical workshops are perfect for anyone looking to build professional-quality websites. Check out our upcoming live streams and secure your spot today! | | | | | |
| | Tilda Education: Latest Articles | | | |
|  | | Popular Web Design Styles | | Explore popular web design styles with real #madeontilda examples and learn how to use them on your website. | | | | |
| | Latest Videos On Design & Marketing | | | |
|  | | Tilda Grant For Nonprofits | | Every month we give away 5 annual subscriptions to nonprofit and social change organizations active in science & tech, volunteerism, healthcare, culture & arts, social welfare, etc. | | | |
| You are subscribed to the Tilda Newsletter because you agreed to receive our monthly news digest when you signed up for https://tilda.ccIf you no longer wish to receive our newsletter, click UNSUBSCRIBE | |
| |